개발/🟩 Spring, Spring Boot
🟩 [Thymeleaf] 자주 쓰는 문법
비니_
2025. 3. 7. 11:05
728x90
| 문법 | 사용법 | 예시 |
❗ 잘 알아야 할 부분 ❗ |
||
| th:text | 텍스트 내용을 동적으로 설정 | <h1 th:text="'안녕하세요, ' + ${user.name} + '!'">기본 텍스트</h1> => user.name이 홍길동이라고 칠때 안녕하세요, 홍길동! <p th:utext="${htmlContent}"></p> => 가정: htmlContent 가 <strong>안 <br> 녕</strong> => 결과: <strong>안 <br> 녕</strong> |
| th:utext | 텍스트 내용을 실제 HTML 요소로 렌더링 | <p th:utext="${htmlContent}"></p> => 가정: htmlContent 가 <strong>안 <br> 녕</strong> => 결과: 안 녕 |
| th:block | th:block은 렌더링되는 HTML 요소 없이 특정 처리를 하거나 반복문, 조건문을 사용하고 싶을 때 유용 ✔ 조건문: if 조건이 ture 일 때만 렌더링 ✔ 반복문: 리스트나 배열의 각 항목을 순차적으로 렌더링 ✔ 장점: 템플릿 코드의 구조화 |
✔ 조건문 <th:block th:if="${ssRootCompanyId == 'C000001000' || ssRootCompanyId == 'C000001010'}"> <h1>특정 회사에 대한 정보</h1> <p>이 회사에만 보여지는 내용입니다.</p> </th:block> => ssRootCompanyId가 'C000001000' 또는 'C000001010'일 때만 하위 태그들이 보여짐 ✔ 반복문 <ul> <th:block th:each="companyId : ${companyIds}"> <th:block th:if="${companyId == 'C000001000' || companyId == 'C000001010'}"> <li>회사를 찾았습니다! 회사 ID: <span th:text="${companyId}"></span> </li> </th:block> </th:block> </ul> => 가정: companyIds 배열이 ['C000001000', 'C000001010', 'C000001020', 'C000001030'] => 결과: <ul> <li>회사를 찾았습니다! 회사 ID: C000001000</li> <li>회사를 찾았습니다! 회사 ID: C000001010</li> </ul> |
참고 할 부분 |
||
| th:href | href 속성에 서버 측 변수를 동적으로 바인딩 | <a th:href="@{'/profile/' + ${user.id}}">프로필 페이지</a> |
| th:src | 이미지 URL을 동적으로 설정 | <img th:src="@{'/images/' + ${user.profileImage}}" alt="프로필 이미지"> |
| th:each | 컬렉션을 반복하여 각 항목을 출력 | <ul> <li th:each="item : ${items}" th:text="${item}">리스트 항목</li> </ul> => ${items} 리스트를 순회하면서 각 항목을 <li> 태그 안에 출력 |
| th:if | 조건문을 사용해 해당 요소를 조건적으로 렌더링 | <p th:if="${user != null}" th:text="'사용자: ' + ${user.name}">사용자 정보</p> => ${user != null}이 true일 때만 해당 <p> 태그를 렌더링 |
| th:unless | unless는 if의 반대 조건이 false일 때 요소를 표시 |
<p th:unless="${user != null}">사용자가 없습니다.</p> => ${user != null}이 false일 때 해당 <p> 태그를 렌더링 |
| th:attr | 여러 속성들을 한 번에 동적으로 변경 | <a th:attr="href=@{'/profile/' + ${user.id}}, title=${user.name}">프로필</a> |
| th:class | 조건에 따라 클래스 값을 동적으로 설정 | <div th:class="${user.active} ? 'active' : 'inactive'">사용자 상태</div> => ${user.active}가 true이면 'active' 클래스, 그렇지 않으면 'inactive' 클래스를 설정 |
| th:classappend | 클래스 추가 | <div th:classappend="${isActive} ? 'active' : 'inactive'"></div> |
| th:style | 조건에 따라 스타일을 동적으로 변경 | <div th:style="'background-color: ' + ${user.favoriteColor}">배경 색상</div> => ${user.favoriteColor} 값에 따라 배경 색상을 설정 |
| th:object | 폼 요소의 model 객체를 바인딩 | <form th:action="@{/submit}" th:object="${user}"> <input type="text" th:field="*{name}" /> <input type="text" th:field="*{age}" /> <button type="submit">전송</button> </form> => th:object="${user}"로 폼 객체를 바인딩하고, th:field="*{name}"로 name과 age 값을 자동으로 바인딩 |
| th:switch / th:case | 주어진 값에 따라 여러 조건을 선택 조건문을 사용할 때 switch-case처럼 사용 |
<div th:switch="${user.status}"> <p th:case="'active'">활성화된 사용자</p> <p th:case="'inactive'">비활성화된 사용자</p> <p th:case="*">알 수 없는 상태</p> </div> => ${user.status}가 "active"일 경우 "활성화된 사용자", "inactive"일 경우 "비활성화된 사용자", 그 외의 값은 "알 수 없는 상태"를 출력 |
| th:fragment | 템플릿을 재사용 가능한 조각으로 나눠서 관리 | <!-- fragment 정의 --> <div th:fragment="userDetails"> <h2 th:text="${user.name}">이름</h2> <p th:text="${user.age}">나이</p> </div> <!-- fragment 호출 --> <div th:replace="~{::userDetails}"></div> => th:fragment를 사용해 재사용 가능한 템플릿 조각을 정의하고, th:replace를 사용해 호출함 |
| th:include | 외부 템플릿 파일을 불러와서 현재 템플릿의 해당 위치에 내용을 삽입 - @{}를 사용해 경로를 지정 |
<th:block th:include="@{header.html}"></th:block> => 해당 구역에 header.html 내용을 뿌려줌 <div th:include="@{header.html}"></div> => div 안에 header.html 내용을 뿌려줌 |
| th:replace | 다른 템플릿 파일에서 특정 HTML 조각을 불러와서 해당 위치에 삽입 | <div th:replace="~{header :: commonHeader}"></div> => header.html 파일에서 th:fragment="commonHeader"라고 정의된 부분으로 교체 |
| th:fragment + th:include | <th:block layout:fragment="sanctnPop" th:include="@{content/wlfare/sanctnPop}"></th:block> => th:block 은 타임리프 구문을 처리하기 위한 용도 => layout:fragment는 타임리프 레이아웃 기능의 일부로, 특정 부분을 '프래그먼트(fragment)'로 정의 => content/wlfare/sanctnPop 경로의 파일을 include 한다 |
|
** th:fragment + th:include
| 전제 조건 | fragment 기입 여부 |
예시 |
| include하는 파일 전체를 뿌릴 때 | X | 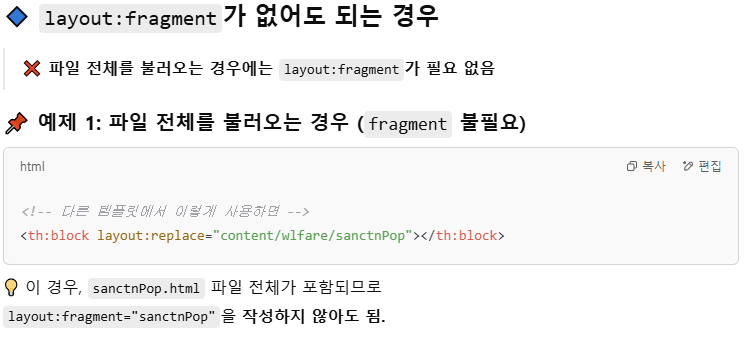 |
| 재사용성이 없을 때 ex) 전체 5파일 중 1파일에서만 해당 include를 사용할 때 |
X | |
| 재사용성이 있어도 전체 파일을 뿌릴 때 | X | |
| include하는 파일 전체가 아닌 일부를 뿌릴 때 |
O |  |
| 재사용성이 있을 때 ex) 전체 5파일 중 2파일 이상에서 사용하고 있을 때 |
O |
728x90